To display all lines from Pencil.ad that contain the string "Pencil Sharpener", type:
find "Pencil Sharpener" pencil.ad
To find a string that contains text within quotation marks, you must enclose the entire string in quotation marks. Then you must use two quotation marks for each quotation mark contained within the string. To find "The scientists labeled their paper "for discussion only." It is not a final report." in Report.doc, type:
find "The scientists labeled their paper ""for discussion only."" It is not a final report." report.doc
If you want to search for a set of files, you can use the find command within the for command. To search the current directory for files that have the extension .bat and that contain the string "PROMPT", type:
for %f in (*.bat) do find "PROMPT" %f
To search your hard disk to find and display the file names on drive C that contain the string "CPU", use the pipe (|) to direct the output of the dir command to the find command as follows:
dir c:\ /s /b | find "CPU"
Because find searches are case-sensitive and dir produces uppercase output, you must either type the string "CPU" in uppercase letters or use the /i command-line option with find.
Etherchannel/port-channel
On different Cisco switches it is possible to create logical connections that are made-up off different fysical interface. It is needed that these interface do have the same speed.
Cisco switch show command’s
· show interfaces port-channel[channel-group-number]
EtherChannel is a port trunking (link aggregation being the general term) technology or port-channel architecture used primarily on Cisco switches. It allows grouping several physical Ethernet links to create one logical Ethernet link for the purpose of providing fault-tolerance and high-speed links between switches, routers and servers. An EtherChannel can be created from between two and eight active Fast Ethernet, Gigabit Ethernet or 10-Gigabit Ethernet ports, with an additional one to eight inactive (failover) ports which become active as the other active ports fail. EtherChannel is primarily used in the backbone network, but can also be used to connect end user machines. http://en.wikipedia.org/wiki/EtherChannel
Trunking
In modern communications, trunkingis a concept by which a communications system can provide network access to many clients by sharing a set of lines or frequencies instead of providing them individually. This is analogous to the structure of a tree with one trunk and many branches. Examples of this include telephone systems and the VHF radios commonly used by police agencies. More recently port trunking has been applied in computer networking as well. http://en.wikipedia.org/wiki/Trunking
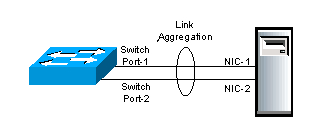
Link Aggregation between a switch and a server
Link aggregation/Port trunking Link aggregation or IEEE 802.1AX-2008 is a computer networking term which describes using multiple network cables/ports in parallel to increase the link speed beyond the limits of any one single cable or port, and to increase the redundancy for higher availability. http://en.wikipedia.org/wiki/Link_aggregation http://en.wikipedia.org/wiki/Port_trunking
When a get a call from a user that explains a problem they are having, I would immediately visualize the OSI model. The user might say that they can’t bring up a graphic they are trying to download from the Internet. That graphic is brought up in an application. (layer 7 of the OSI model). I could either start at the top or the bottom, depending on what I suspected was the problem. I would usually start at the bottom (termed the “bottom up approach”). At the bottom of the OSI model is the physical layer (layer 1). So, I would proceed to ask them questions like this:
Is your network cable plugged in? (physical)
Is there a link light on the Ethernet switch and Ethernet NIC? (data-link)
Do you have an IP address? (network)
Can you ping your default gateway? (network, testing LAN IP connectivity)
Do you have DNS server information?
Can you ping your DNS server? (network, testing IP connectivity)
Do you have a firewall configured? (network on up to application)
Can you ping the host you are trying to get to by name? (application, DNS and network WAN IP connectivity)
What format is the graphic in? Do you have a viewer for that format? (presentation)
Can your web browser open up another website? (basic application troubleshooting)
If your Internet connection is slow or unstable, it might cause authentication error as a result of time out. Check your Internet connection.
3. Losing connection
Once you've logged in, every new URL that opens will begin with: https:///
If a new window opens without it, it's a sign you've lost connection to the VPN service.
4. Proxy settings
If you are connected successfully and you can't reach sites with your browser (The problem repeats itself especially when connected behind a router) - try to change your proxy settings.
control traffic based on the IP address and protocol -> access lists control access for specific users or groups -> authentication control use for specific users or groups -> authorization
Authentication-> who the user is Authorization-> what the user can do Accounting-> what the user did
Authentication refers to the process where an entity's identity is authenticated, typically by providing evidence that it holds a specific digital identity such as an identifier and the corresponding credentials. Examples of types of credentials are passwords, one-time tokens, digital certificates, and phone numbers (calling/called).
Authorization
The "authorization" function determines whether a particular entity is authorized to perform a given activity, typically logging on to an application or service. Authorization may be determined based on a range of restrictions, for example time-of-day restrictions, or physical location restrictions, or restrictions against multiple logins by the same entity or user. Examples of types of service include, but are not limited to: IP address filtering, address assignment, route assignment, Quality of Service/differential services, bandwidth control/traffic management, compulsory tunneling to a specific endpoint, and encryption.
Accounting
Accounting refers to the tracking of the consumption of network resources by users. This information may be used for management, planning, billing, or other purposes. Real-time accounting refers to accounting information that is delivered concurrently with the consumption of the resources. Batch accounting refers to accounting information that is saved until it is delivered at a later time. Typical information that is gathered in accounting is the identity of the user, the nature of the service delivered, when the service began, and when it ended.
Issue this command in order to check the number of SSH sessions that are connected and the connection state to the PIX:
pix#show ssh session

SID Client IP       Version Mode Encryption Hmac     State            Username
0   10.1.1.2        1.99    IN   aes128-cbc md5      SessionStarted   pix
                            OUT  aes128-cbc md5      SessionStarted   pix
The packet-tracer command lets you do the following:
Debug all packet drops in production network.
Verify the configuration is working as intended.
Show all rules applicable to a packet along with the CLI lines which caused the rule addition.
Show a time line of packet changes in a data path.
Inject tracer packets into the data path.
The packet-tracer command provides detailed information about the packets and how they are processed by the security appliance. In the instance that a command from the configuration did not cause the packet to drop, the packet-tracer command will provide information about the cause in an easily readable manner. For example if a packet was dropped because of an invalid header validation, a message is displayed that says, “packet dropped due to bad ip header (reason).”
A - Alpha B - Bravo C -Charlie D - Delta E - Echo F - Foxtrot --> France, Frank G - Golf H - Hotel I - India J - Juliet K - Kilo L - Lima M - Mike N - November O - Oscar P - Papa Q - Quebec --> Queen R - Romeo --> Robert, Roger S - Sierra -->Sugar T - Tango U - Uniform V - Victor W - Whiskey --> Willie, William X - X-ray Y - Yankee Z - Zulu
Apples Butter Charlie Duff Edward Freddy George Harry Ink Johnnie King London Monkey Nuts Orange Pudding Queenie Robert Sugar Tommy Uncle Vinegar Willie Xerxes Yellow Zebra
Ack
Beer
Charlie Don Edward Freddie Gee Harry Ink Johnnie King London Emma Nuts Oranges Pip Queen Robert Esses Toc Uncle Vic William X-ray Yorker Zebra
Ace
Beer
Charlie Don Edward Freddie George Harry Ink Johnnie King London Monkey Nuts Orange Pip Queen Robert Sugar Toc Uncle Vic William X-ray Yorker Zebra
Able/Affirm Baker Charlie Dog Easy Fox George How Item/Interrogatory Jig/Johnny King Love Mike Nab/Negat Oboe Peter/Prep Queen Roger Sugar Tare Uncle Victor William X-ray Yoke Zebra
Able Baker Charlie Dog Easy Fox George How Item Jig King Love Mike Nan Oboe Peter Queen Roger Sugar Tare Uncle Victor William X-ray Yoke Zebra
ASA5510#show disk0:-#- --length-- -----date/time------ path 6 5124096 Jan 01 2003 00:06:22 asa702-k8.bin7 5623108 Feb 12 2007 00:23:48 asdm-522.bin 10 5539756 Feb 12 2007 00:14:18 asdm-521.bin 11 8294400 Dec 07 2006 05:47:20 asa721-24-k8.bin 12 6002680 Dec 21 2006 03:58:30 asdm-52034.bin13 8312832 Feb 12 2007 22:46:30 asa722-k8.bin
23949312 bytes available (38932480 bytes used)
!--- Command to set "asa722-k8.bin" as the boot image.ASA5510(config)# boot system disk0:/asa722-k8.bin!--- Command to set "asdm-522.bin" as the ASDM image.ASA5510(config)# asdm image disk0:/asdm-522.binASA5510#write memoryASA5510# reload
To verify ASA boot image
1. show run boot
2. show boot
To verify ASDM image
1. show run asdm
2. show asdm image
1. sh mac-adress table int f0/x
,where x is the port number.
2. log into the default gatway router
3 sh ip arp xxxx.xxxx.xxxx
, where xxxx.xxxx.xxxx is the MAC address
If you have a big network with multiple Access Switches connecting to the core switches or routers then tracing a device like a PC or a laptop for troubleshooting or security purposes is one of those tasks that you often end up doing. This is not a difficult task but can certainly be time consuming.
Lets start with an IP address on hand. If you have an IP address on hand quickly ping and check if the device is pingable. If yes, then simply logon to one of your core switches or routers and do a simple sh ip arp
Core1# sh ip arp 192.168.1.15
Protocol Address Age (min) Hardware Addr Type Interface
Internet 192.168.1.15 22 0000.1111.1111 ARPA Vlan1
From the above you know the MAC Address of for the device: IP Address : 192.168.1.15
MAC Address : 0000.1111.1111
Now, do a show mac-address command on the core switch or router. This will show the interface to which it is connected or through which it is learned.
Example 1:
rssv125-sw5# show mac-address-table address 0002.3F39.BFE6
You will get a response similar to this:
          Mac Address Table
 -------------------------------------------
 Vlan    Mac Address       Type        Ports
 ----    -----------       --------    -----
   59    0002.3f39.bfe6    DYNAMIC     Fa0/24
 Total Mac Addresses for this criterion: 1
If your port is a FastEthernet port (Fa0/nn) like this example shows, you know that you are connected to FastEthernet port 0/24 on switch 10.10.125.5 (rssv125-sw5).
However, many times you will get a response similar to this:
          Mac Address Table

-------------------------------------------

Vlan    Mac Address       Type        Ports

----    -----------       --------    -----

59    0002.3f39.bfe6    DYNAMIC     Gi0/1

Total Mac Addresses for this criterion: 1
The Gi0/n indicates you are connected to a gigabit port. Since the gigabit ports only go to other switches, you know you are connected to another switch. To see what the neighboring switches are, use CDP (Cisco Discovery Protocol).
rssv125-sw5# show cdp neighbor Gi0/1 detail
The response should be something similar to this:
Device ID: rssv125-sw4

Entry address(es):

IP address: 10.10.125.4

Platform: cisco WS-C3550-24-PWR,  Capabilities: Switch IGMP

Interface: GigabitEthernet0/1,  Port ID (outgoing port):  GigabitEthernet0/1

[snip]
Now go back to the telnet step above and run through it again except this time use the 10.10.125.4 IP address from the show cdp neighbor output. Repeat until you find the switch and port you are connected to.
Example 2:
Core1# sh mac-address-table address 0000.1111.1111
Legend: * – primary entry
age – seconds since last seen
n/a – not available
vlan mac address type learn age ports
——+—————-+——–+—–+———-+————————–
Supervisor:
* 1 0000.1111.1111 dynamic Yes 10 Te1/1
This indicates that the device is either connected to the port or though another switch which is connected to the interface. Looking at this, it is very likely that this is a uplink (TenGigabit Ethernet link) to another Distribution or Access switch.
Sometimes, the output might show as follows [note the Po1]
Legend: * – primary entry
age – seconds since last seen
n/a – not available
vlan mac address type learn age ports
——+—————-+——–+—–+———-+————————–
Supervisor:
* 1 0000.1111.1111 dynamic Yes 10 Po1
This indicates that there is a etherchannelis being setup. So do a "show etherchannel" command to find the phsycial ports that are paired.
Core1# show etherchannel summary Flags: D – down P – bundled in port-channel
I – stand-alone s – suspended
H – Hot-standby (LACP only)
R – Layer3 S – Layer2
U – in use f – failed to allocate aggregator
M – not in use, minimum links not met
u – unsuitable for bundling
w – waiting to be aggregated
Number of channel-groups in use: 6
Number of aggregators: 6
Group Port-channel Protocol Ports
——+————-+———–+———————————————–
1 Po1(SU) - Te1/1(P) Te2/1(P)
This shows the ports Te1/1 or Te2/1 as a source through which the address is learnt.
Now, do a "show cdp neighbors" to show the directly connected devices.
Core1# sh cdp neighbors
Capability Codes: R – Router, T – Trans Bridge, B – Source Route Bridge
S – Switch, H – Host, I – IGMP, r – Repeater, P – Phone
Device IDLocal Intrfce Holdtme Capability Platform Port ID Access1 Ten 1/1 129 R S I WS-C6509 Ten 1/1
That tells you, it is the Access switch 1 that is connected to Te1/1 and not the device itself.
Now, log onto the Access switch and do a "show mac-adddress-table" command for the MAC address and that should show the interface to which it is connected [NOTE: unless it is a distribution switch to again there are a bunch of Access switches connected in which case, you need to go through the whole procedure as above again]
Access1# show mac-address-table 0000.1111.1111
vlan mac address type learn age ports
——+—————-+——–+—–+———-+————————–
Supervisor:
* 1 0000.1111.1111 dynamic Yes 10 Gi1/24
As you can see which port the device is connected and on which switch.
Now do a "show interface" command to show the port details.
Access1>sh int gigabitEthernet 1/24
GigabitEthernet1/24 is up, line protocol is up (connected) Hardware is C6k 1000Mb 802.3, address is xxxx.xxxx.xxxx (bia xxxx.xxxx.xxxx) MTU 1500 bytes, BW 1000000 Kbit, DLY 10 usec, reliability 255/255, txload 1/255, rxload 1/255 Encapsulation ARPA, loopback not set Keepalive set (10 sec) Full-duplex, 1000Mb/s ….. … .. .
There you go you found the device switchport that you tried to trace!!!
Complete the conversion process by installing the converted configuration on an ASA 5500 Series Adaptive Security Appliance running 7.0(x), 7.2(x), or 8.x software.
ip address 192.168.2.1 255.255.255.0 standby 192.168.2.2
nameif outside
security-level 0
VLAN:
interface gb-ethernet2 1000auto
interface gb-ethernet2 vlan50 logical
nameif vlan50 vlan50 security10
ip address vlan50 50.1.1.1 255.0.0.0
interface GigabitEthernet0/0
no shutdown
interface GigabitEthernet0/0.50
vlan 50
ip address 50.1.1.1 255.0.0.0
nameif vlan50
security-level 10
Dynamic IP address through DHCP:
interface ethernet0 10baset
nameif ethernet0 outside security0
ip address outside dhcp setroute
interface GigabitEthernet0/0
no ip address
no shutdown
ip address dhcp setroute
nameif outside
security-level 0
Dynamic IP address through PPPOE:
interface ethernet0 10baset
nameif ethernet0 outside security0
ip address outside pppoe setroute
vpdn group pppoex request dialout pppoe
vpdn group pppoex localname cisco
vpdn group pppoex ppp authentication pap
vpdn username cisco password xxx
interface GigabitEthernet0/0
ip address pppoe setroute
pppoe client route distance 2
pppoe client vpdn group pppoex
nameif outside
security-level 0
vpdn group pppoex request dialout pppoe
vpdn group pppoex localname cisco
vpdn group pppoex ppp authentication pap
vpdn username cisco password xxx
Table 5 FIXUP Conversion
PIX/ASA 6.3 commands
(before conversion)
PIX/ASA 7.2(2) commands
(after conversion)
fixup protocol dns maximum-length 512
fixup protocol ftp 21
fixup protocol h323 h225 1720
fixup protocol h323 ras 1718-1719
fixup protocol http 80
fixup protocol rsh 514
fixup protocol rtsp 554
fixup protocol sip 5060
fixup protocol sip udp 5060
fixup protocol skinny 2000
fixup protocol smtp 25
fixup protocol sqlnet 1521
fixup protocol tftp 69
policy-map type inspect dns preset_dns_map
parameters
message-length maximum 512
policy-map global_policy
class inspection_default
inspect dns preset_dns_map
inspect ftp
inspect h323 h225
inspect h323 ras
inspect http
inspect rsh
inspect rtsp
inspect sip
inspect skinny
inspect smtp
inspect sqlnet
inspect tftp
LAN-Based Failover
PIX 6.3(5) configuration (before conversion):
interface gb-ethernet0 1000auto interface gb-ethernet1 1000auto interface gb-ethernet2 1000auto interface gb-ethernet2 vlan50 logical interface gb-ethernet2 vlan55 logical interface ethernet0 100full interface ethernet1 100full nameif gb-ethernet0 outside security0 nameif gb-ethernet1 inside security100 nameif gb-ethernet2 dmz security8 nameif ethernet0 eng security4 nameif ethernet1 mkt security4 nameif vlan50 vlan50 security10 nameif vlan55 vlan55 security12 ip address outside 5.5.5.45 255.255.255.0 ip address inside 14.36.8.48 255.255.0.0 ip address dmz 1.1.1.6 255.255.255.0 ip address mkt 2.2.2.2 255.255.255.0 ip address vlan50 50.1.1.1 255.0.0.0 failover failover timeout 0:00:00 failover poll 15 failover ip address outside 5.5.5.68 failover ip address inside 14.36.199.34 failover ip address mkt 2.2.2.4 failover ip address vlan50 50.1.1.2 failover lan unit primary failover lan interface mkt failover link vlan55 failover lan enable
Converted ASA configuration:
interface GigabitEthernet0/0 ip address 5.5.5.45 255.255.255.0 standby 5.5.5.68 nameif outside security-level 0 : Original Interface id gb-ethernet1 interface GigabitEthernet0/1 ip address 14.36.8.48 255.255.0.0 standby 14.36.199.34 nameif inside security-level 100 : Original Interface id gb-ethernet2 interface GigabitEthernet0/2 ip address 1.1.1.6 255.255.255.0 nameif dmz security-level 8 : Original Interface id gb-ethernet2_50 interface GigabitEthernet0/2.50 vlan 50 ip address 50.1.1.1 255.0.0.0 standby 50.1.1.2 nameif vlan50 security-level 10 : Original Interface id gb-ethernet2_55 interface GigabitEthernet0/2.55 vlan 55 no ip address no shutdown : Original Interface id ethernet0 interface GigabitEthernet0/3 no ip address no shutdown nameif eng : Original Interface id ethernet1 : Failover interface GigabitEthernet1/0 security-level 4 failover failover timeout 0:00:00 :::: your failover poll timer syntax has been corrected from'failover poll 15' to 'failover polltime 15' failover polltime 15 failover lan unit primary ::::failover lan interface mkt -> failover lan interface mkt GigabitEthernet1/0 failover lan interface mkt GigabitEthernet1/0 failover interface ip mkt 2.2.2.2 255.255.255.0 standby 2.2.2.4 ::::failover link vlan55 -> failover link vlan55 GigabitEthernet0/2.55 failover link vlan55 GigabitEthernet0/2.55 failover interface ip vlan55 0.0.0.0 0.0.0.0 standby 0.0.0.0 :::: Not supported - failover lan enable


 manual conversion